One of the best things about motorcycling is spending a nice day exploring twisty back roads far from home. One of the worst things is getting lost while running low on fuel and being clueless not only about where you are but where to find gas. Fortunately, technology comes to the rescue again with a variety of water-resistant GPS units built especially for motorcycles. Last week, I became the owner of a Garmin Zumo 660 GPS. I also purchased a bluetooth headset kit for my helmet so I could hear the unit.
 After a rocky start, which included trying to charge the Sena SMH10 bluetooth device through the MP3 port (doh!), I spent a couple of rainy nights familiarizing myself with the Garmin. It’s an impressive device, as it should be with a retail price over $700. But it had one very disappointing handicap: it can only import route sheets from Garmin’s MapSource software. Not only do Google, MapQuest and Bing Maps make MapSource look like a relic from the Windows 3 era, MapSource is only available for Windows, not my Mac.
Yes, the Garmin will let you import destination points from the more popular online map vendors but the Garmin will construct the route for you. That’s fine if you want to get to Point B as quickly as possible but I usually don’t want the fastest route. I usually want one of the least efficient paths — one which will take me through small villages and across covered bridges with a stop at my favorite hot dog stand which may 20 miles off the optimum route the Garmin creates for me. (For instance, my favorite route from Washington, DC to NYC is through West Virginia’s Monongahela Forest).
Garmin recognizes this so it allows you to construct a route based on waypoints, or mini-destinations within the larger route. You can do this in MapSource or in the Garmin itself. But you can’t do this using Google Maps because it doesn’t export the GPX-formatted file that the Garmin wants to construct a route based on waypoints.
Ironically, or perhaps justifiably, Google gave me the solution to fix this: a handy browser plug-in for Firefox called GMapToGPX. What this does is read your current Google Maps route and create a GPX list of ordered waypoints in GPX format which can be imported into MapSource, from which it can then be exported to your Garmin. Here’s how it’s done.
First, go to http://www.elsewhere.org/journal/gmaptogpx/ and follow the instructions, which are simple: just drag the GMapToGPX link to your Firefox bookmarks toolbar in the top navigation.
Next, create your route in Google Maps, as you normally would, dragging alternative routes around as much as you like.
When you’re satisfied with your route, click the GMapToGPX bookmark in your Firefox toolbar.
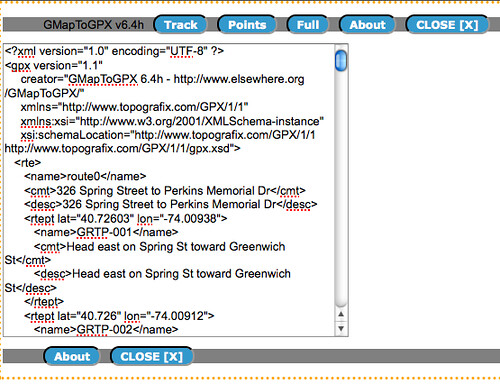
That will load GMapToGPX’s JavaScript which will construct an XML-formatted dump file of the route you’ve built in Google Maps. All you have to do is left-click on that listing, type Ctrl-A and Ctrl-C (Windows) or Command-A and Command-C (Mac) to copy those instructions to memory. Then open a new file in a non-corrupting editor like Notepad (Windows) or TextEdit (Mac) and paste it using Ctrl-V (Windows) or Command-V (Mac). Then save the file somewhere on your disk.
(Instructions for non-noobs: just copy/paste the XML contents to a local file. The End.)
So far, so good. You can confirm that the route that GMapToGPX exported is what you intended using another online resource: GPS Visualizer. Just upload the file you created and it will display that route using (of course) Google Maps!
So how do we get it into the Garmin? Alas, you’ll probably have no choice but to use the Garmin’s MapSource for this. I’ve read about the option of using MSN Traffic to send it over the air but I don’t have an MSN account so that will remain untested by me.
Although I’m a Mac/Unix guy, I have Windows running in a VMWare virtual machine so I saved those XML instructions in a file that’s serviced by a Samba share accessible to both the Mac and Windows. If you’re a Mac user, you can figure it out.
First, attach your Garmin device to the computer via its USB cable and load the MapSource software in Windows. Then use File -> Open to load the XML file you just created. You should see the open file under the Routes tab, probably with a name like route0. Double click on it, then click on Show On Map. Then click on OK. Your file of waypoints is now loaded into MapSource. You can confirm the route again or you can save it to your Garmin.
Click on Transfer -> Send to Device. Select your GPS model from the list, make sure that Route is checked and then click Send. Within a couple of seconds you should get confirmation that the data was sent to the Garmin successfully.
Last Step: unmount your Garmin (unplug it), replace the battery door (Garmin 660 annoyance) and reboot the Garmin. The data you sent to the Garmin is sitting in a holding area and hasn’t been processed. Processing it is what you have to do next. From the main screen, click on Tools -> My Data -> Import Data -> Routes. You should see your new file in the list. Touch the checkbox next to it, then Import. The Garmin will crunch away for a few seconds and should give you a Data Imported Successfully popup.
If everything went well, you should see the new route under Tools -> Custom Routes. From here you can edit the filename to something more descriptive than route0, which in this case is Bear Mountain — a favorite default destination for NYC-area motorcyclists.
Later...
Since writing this article, I found an online trip planner which both uses Google Maps and communicates directly with the Zumo. It’s provided by Harley Davidson:
I’ve used it several time, it works great and it saves a lot of time and steps.